Planning
How to Plan a Commercial Racking Layout from Your Floor Plan
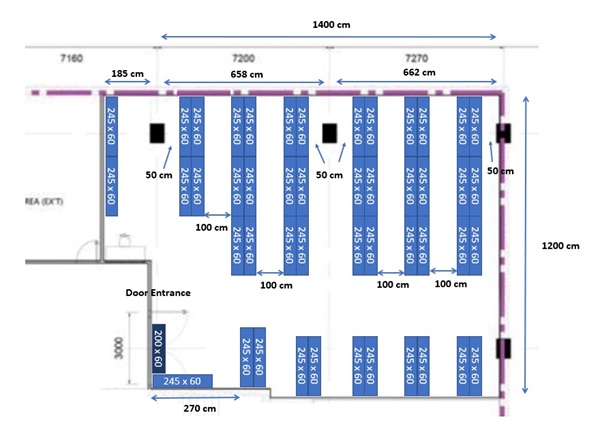
Good commercial racking starts on paper. Before any steel arrives, someone needs to decide where every bay goes, how wide the aisles are and which shelf each product lives on. Get that right and a store room can hold twice as much and be picked twice as fast. Here is the method we use when customers send us their floor plans.
Step 1: Get an accurate floor plan
You do not need a CAD drawing. Any of these will do:
- the architect's or landlord's floor plan (PDF or DWG);
- a photo of the evacuation plan on the wall;
- a sketch on paper with each wall length written on it.
Measure every wall at floor level, because skirting, pipes and columns make rooms smaller than the drawing says.
Step 2: Mark everything that cannot move
On the plan, mark doors and which way they swing, windows, columns, DB boxes and switches, fire extinguishers and hose reels, floor traps and drains, and air-conditioning units. Measure the ceiling height and note the lowest point — usually under beams, ducts or sprinkler heads. Sprinklers in particular need clear space below them; check your building's requirements.
Step 3: List what you store — and how fast it moves
Group your stock into three bands:
- Fast movers — picked daily. These belong between knee and shoulder height, nearest the door or packing bench.
- Medium movers — picked weekly. Next level up or further back.
- Slow movers and overflow — top levels and far ends.
Note the size and weight of the biggest item in each group. The heaviest decide the rack rating; the deepest decide the shelf depth.
Step 4: Choose rack depth and rating
Shelf depth should match your deepest common carton, plus a few centimetres. Too deep and small items get lost at the back; too shallow and cartons overhang into the aisle. For ratings: up to 200kg per shelf, a boltless rack; up to 400kg, a warehouse rack.
Step 5: Set the aisles
Draw the aisles before the racks. Typical clear widths are about 90–100cm for people on foot, 100–120cm with trolleys and around 180cm or more where a pallet jack turns. Main routes to exits should be wider still and never blocked. A narrow aisle that saves one bay but slows every pick is a bad trade.
Step 6: Place the runs
The most efficient pattern is usually racks along the walls plus, in larger rooms, back-to-back "island" runs in the middle with aisles on both sides. Keep runs parallel to the main flow of goods, so pickers walk in straight lines. Leave space at the end of each run to add bays later.
Step 7: Set the shelf levels
Space levels by the height of the goods plus a hand's width to lift them out. Keep the bottom level raised enough to clean under — essential in F&B stores — and the top level low enough to reach with a step platform.
Step 8: Label everything
Give every bay and level a location code — for example aisle, bay, level: A-03-2. Print labels for the beam fronts. It costs almost nothing and makes training, stock-takes and any future warehouse software far easier.
What to send your racking supplier
Send the marked-up floor plan, ceiling height, a few photos of the room from each corner, the size and weight of your biggest items, and when you need the racks installed. That is everything we need to plan a layout without a site visit. Upload it on our free quote form and we will return a layout and a fixed quote.
Planning racking for your business? Send us your floor plan and we will design the layout and quote it for free — usually within one working day.